Project Tutorial
Create a project and perform the OSC (Open Source Compliance) process.
- Project creation
- Identification
- Packaging
- Download OSS Notice
Project Process
1. Create a Project
Create a project for the software being distributed.
-
Click the Add button in the Project List.

-
Enter the project-related information in the New_Project tab.
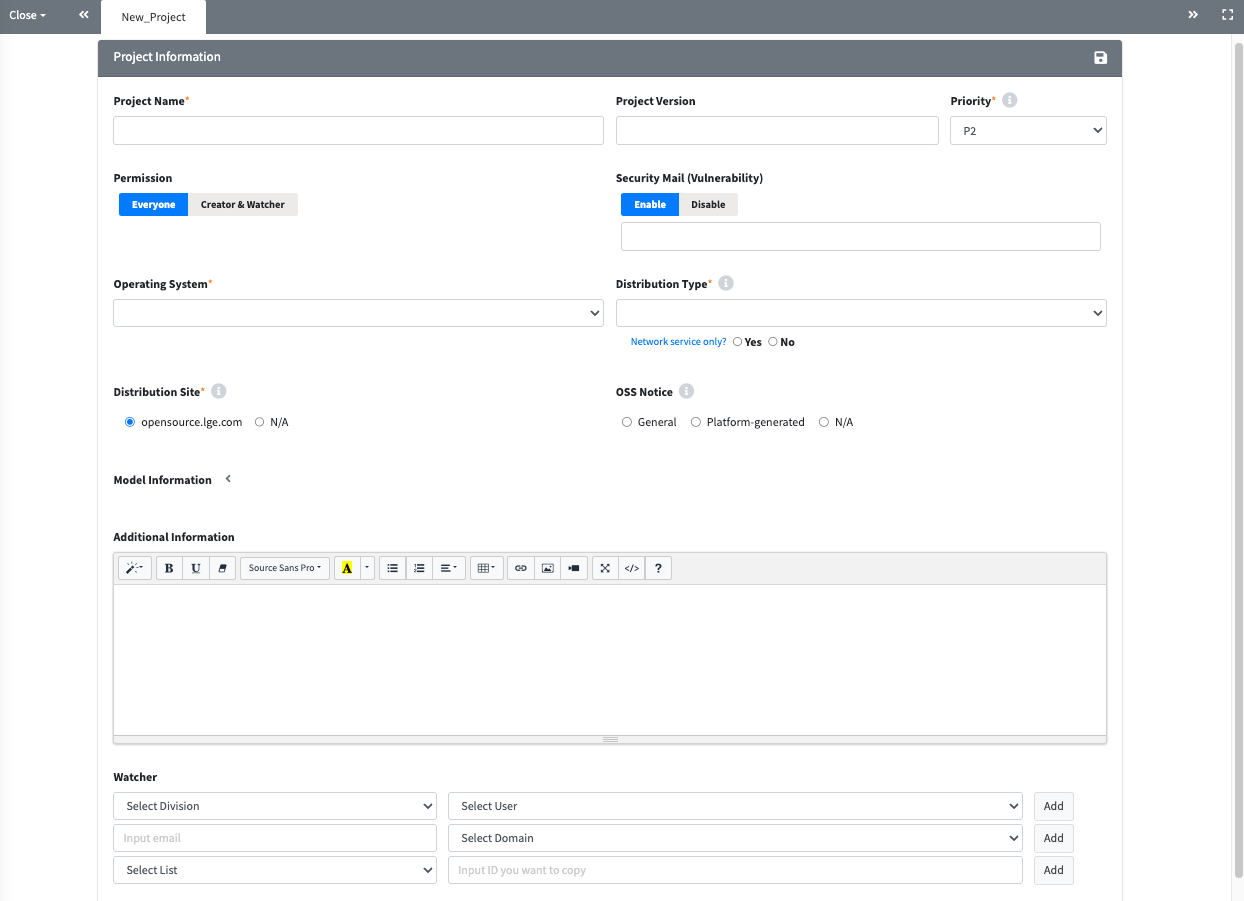
-
Click the Save(
) button at the top right corner to finalize your entries.
Project Information
This page is for entering basic information about the project.
-
Project Name: Enter the project name.
- If the model name is the same as the project name, input the model name (English is recommended).
- Project Version: Enter the project version. Leave blank if not applicable.
- Permission: Set project visibility. Choose ‘Creator & Watcher' for limited visibility, or ‘Everyone' for full visibility.
- Operating System: Select the operating system. If there are no available options, select ‘Input Manually' and enter it.
-
Security Mail (Vulnerability): Indicate whether to receive Vulnerability emails for the project.
- By default, ‘Enable' is selected.
- If ‘Disable' is selected, Vulnerability emails for the project will no longer be received.
- When changing to ‘Disable', the reason for disabling must be entered.
-
Distribution Type: Select one of the following distribution types.
- General Model: Distributing general model, software, or applications.
- Transfer in-house: Transferring to other organization within the company transfers.
- B2B: Providing to another company.
- Preceding Software / In-house only: Preliminary development or not intended for external distribution.
- Network Service only?: Select ‘Yes' if the project is a network service (e.g., Web Service).
-
Distribution Site: Select the OSS distribution site where the OSS notice will be registered (e.g., LG Open Source site).
-
opensource.lge.com: Default distribution site for most cases.
- For network service projects, also select "opensource.lge.com".
- N/A: Select this option if the OSS notice cannot be registered on a site (e.g., source code is delivered directly to a third party).
-
opensource.lge.com: Default distribution site for most cases.
-
OSS Notice: Select the appropriate OSS notice format.
- General: FA standard OSS notice.
- Platform-generated: The OSS notice is generated by a platform (e.g., Android, Yocto) and embedded in the product.
- N/A: No OSS notice is required.
-
Priority: Select the priority level for the OSS notice issuance request.
- The default is P2, and you can choose according to urgency (P0 > P1 > P2).
- Frequent selection of P0 may lead to the organization being subject to OSC process assessments.
- Model Information: Enter the model information corresponding to the project, including the release date.
- Additional Information: Enter any supplementary information required for compliance.
-
Watcher: Add users who want to share the project's information and status.
- Users added as a Watcher have the same viewing and editing permissions as the Creator, and receives project-related emails from the system.
- However, accounts added with AD ID that are not registered in the FOSSLight Hub will only receive the initial account registration email, not project-related emails.
- Comment: Enter any comments or notes related to the project.
Share, Copy, Delete, Save, and etc.
- Share: Shares the project via the generated URL.
- Copy: Creates a new project by duplicating the existing one.
- Delete: Deletes the project.
- Save: To save any modifications, ‘Save' button should be clicked.
- Drop: Changes the project's status to "Drop"; click the Open button to continue processing.
- Open: Appears when the status is "Drop"; clicking it changes the status to "Progress."
- Reopen: Changes the status of a "Complete" project back to "Progress" for reprocessing.
-
(Admin Only):
- Complete: Changes the status of fully completed projects.
- Open: Changes the status to "Progress" for projects with "Complete" or "Drop" statuses.
2. Identification
Write an analysis of the Open Source Software for the distributed project and receive a review from the OSPO.
Click the Identification icon () in the OSC Process section of the Project List to enter.
Identification Process for General Projects
- Click the Request button on the BOM tab after filling out the 3rd Party, DEP, SRC, and BIN tabs for a review request.
- 3rd Party: Load the 3rd Party included in the project.
- DEP: Enter the dependency analysis results.
- SRC: Enter the source code analysis results.
- BIN: Enter the binary analysis results.
- BOM: Compile the OSS list from other tabs and review warning messages before requesting a review.
Identification Process for Android/Yocto Models
- After filling out the BIN(Android/Yocto) tab, click the Request button to request a review.
- BIN(Android/Yocto): Document the analysis results for the Android binary.
2-1. 3rd Party Tab
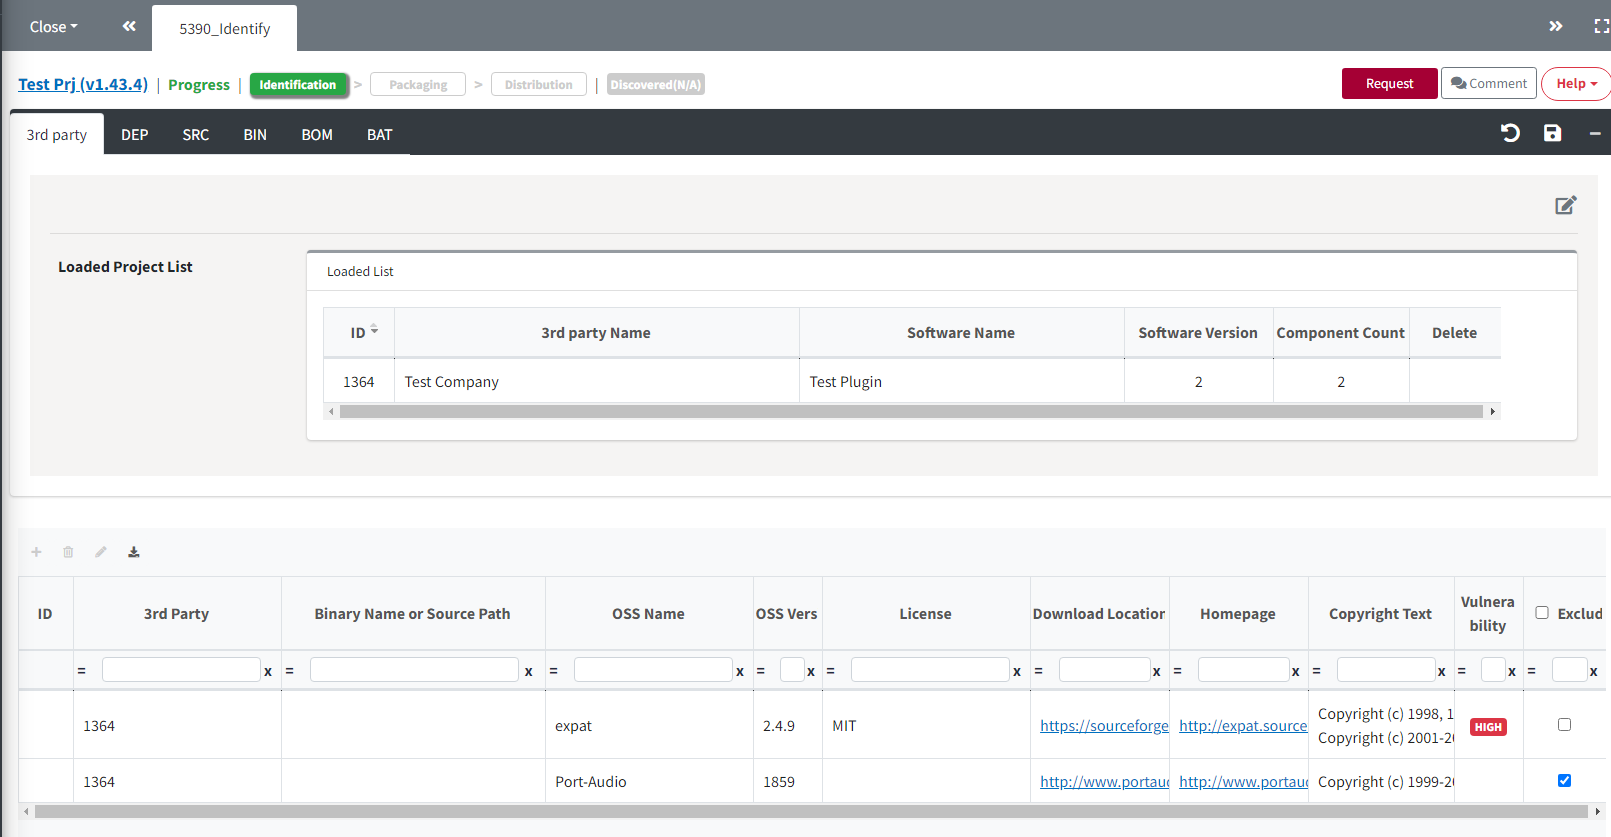
- If the project includes 3rd Party Software: Load the pre-reviewed 3rd Party → Save
- If the project does not include 3rd Party Software: Check "Not Applicable" → Save
How to Load 3rd Party Software
You can choose from the following methods to import 3rd Party Software information.
(💁 You can import multiple 3rd Parties.)
-
3rd Party Search
- Search for reviewed 3rd Party Software in the 3rd Party List menu.
- Select the 3rd Party to load from the search results.
- Click the "Load" button to add the OSS list of the selected 3rd Party.
- The loaded 3rd Party will be added to the Loaded List.
- Check the added OSS list.
- Click the Save button to save the loaded items.
Search for 3rd Party Software with a status of "confirm" in the 3rd Party List menu and load it.
- Project Search: Load the 3rd Party tab from another project.
2-2. DEP Tab
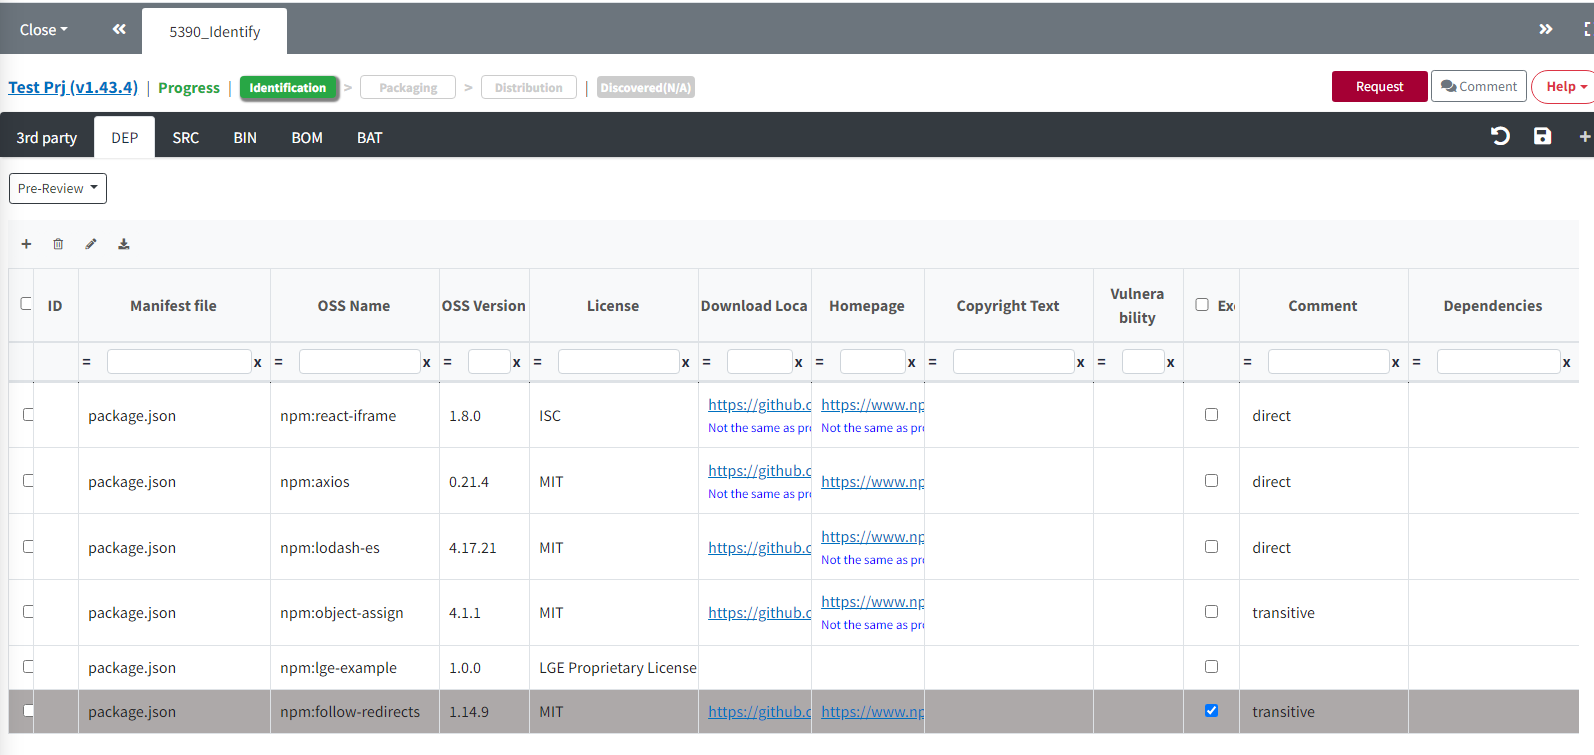
- If OSS is included via a package manager: Document the OSS information for each dependency → Save
- If OSS is not included via a package manager: Check "Not Applicable" → Save
How to Document OSS Information for Each Dependency
-
Manually Enter in OSS Table
- Click the "+" button in the top left corner of the OSS Table to input the OSS information.
-
How to Bulk Load OSS Information
- Upload the FOSSLight Report containing the OSS List in the "Upload Analysis Result" section.
- You can download the compatible FOSSLight Report format by clicking the "Export" button in the top right corner.
- Project Search: Load the DEP tab from another project.
- Upload the FOSSLight Report containing the OSS List in the "Upload Analysis Result" section.
-
How to Automatically Fill Using a Scanner
- A report can be automatically generated with OSS information filled in using the FOSSLight Dependency Scanner.
2-3. SRC Tab
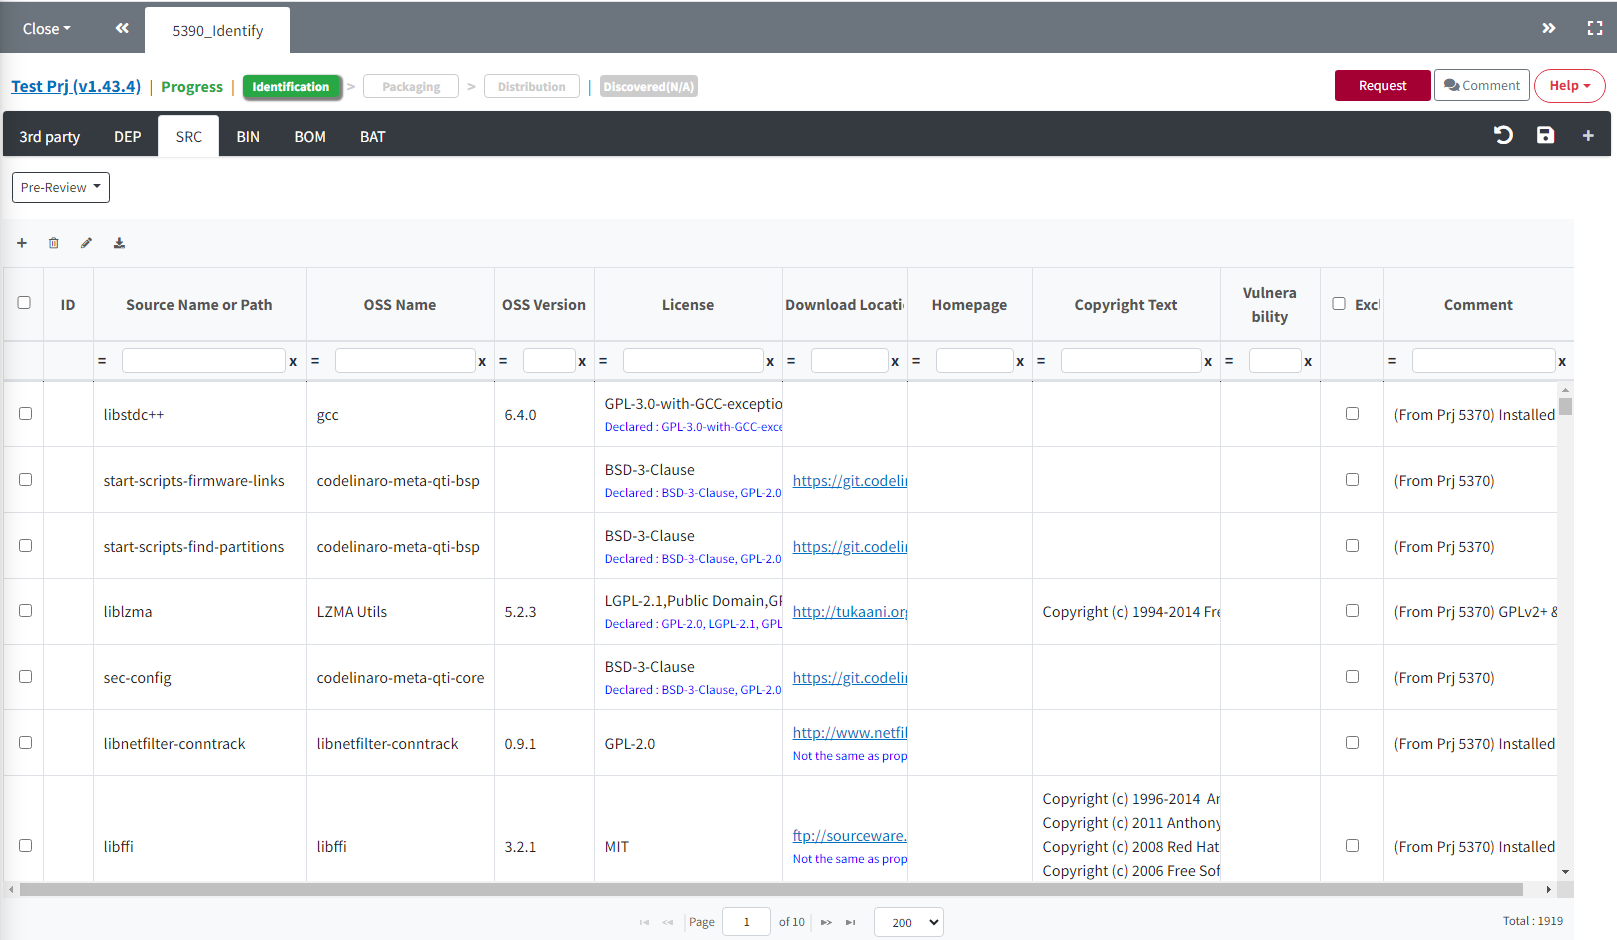
- If OSS is included in the source code: Document OSS information for each source code → Save
- If the source code is not subject to OSS analysis: Check Not Applicable → Save
How to Document OSS Information by Source Code
-
Manually Enter in the OSS Table
- Click the "+" button in the top left corner of the OSS Table to input the OSS information.
-
How to Bulk Load OSS Information
- Upload the FOSSLight Report containing the OSS List in the "Upload Analysis Result" section.
- You can download the compatible FOSSLight Report format by clicking the "Export" button in the top right corner.
- Project Search: Load the SRC tab from another project.
- Upload the FOSSLight Report containing the OSS List in the "Upload Analysis Result" section.
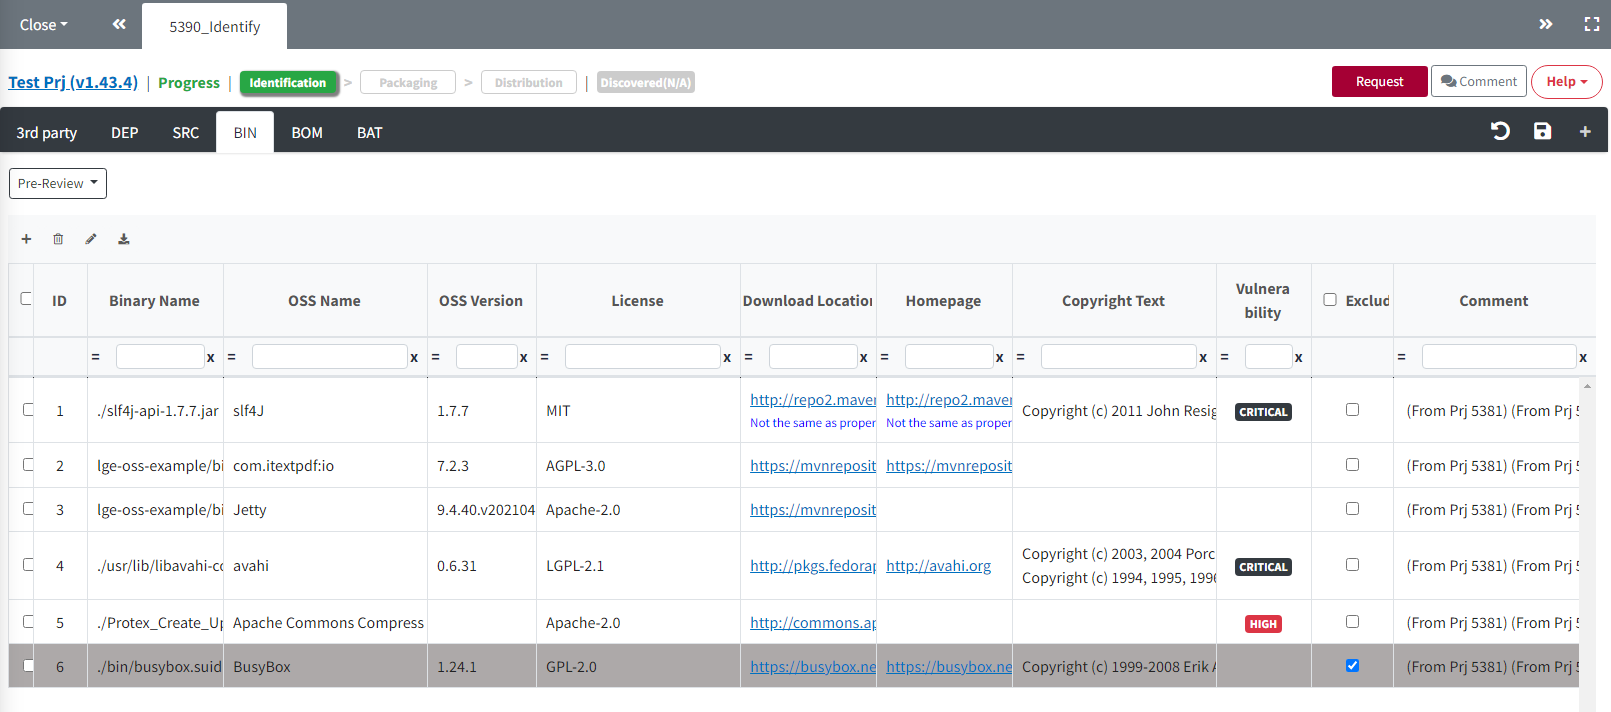
2-4. BIN Tab
BIN Tab Writing Process
- If binaries are included: Document OSS information for each binary → Save
- If binaries are not included: Check "Not Applicable" → Save
How to Document OSS Information by Binary
-
Manually Enter in the OSS Table
- Click the "+" button in the top left corner of the OSS Table to input the OSS information.
-
How to Bulk Load OSS Information
- Upload the FOSSLight Report containing the OSS List in the "Upload Analysis Result" section.
- You can download the compatible FOSSLight Report format by clicking the "Export" button in the top right corner.
- Project Search: Load the BIN tab from another project.
- Upload the FOSSLight Report containing the OSS List in the "Upload Analysis Result" section.
2-5. BOM Tab
Collect the OSS lists written in the 3rd Party, DEP, SRC, and BIN tabs and request a review. 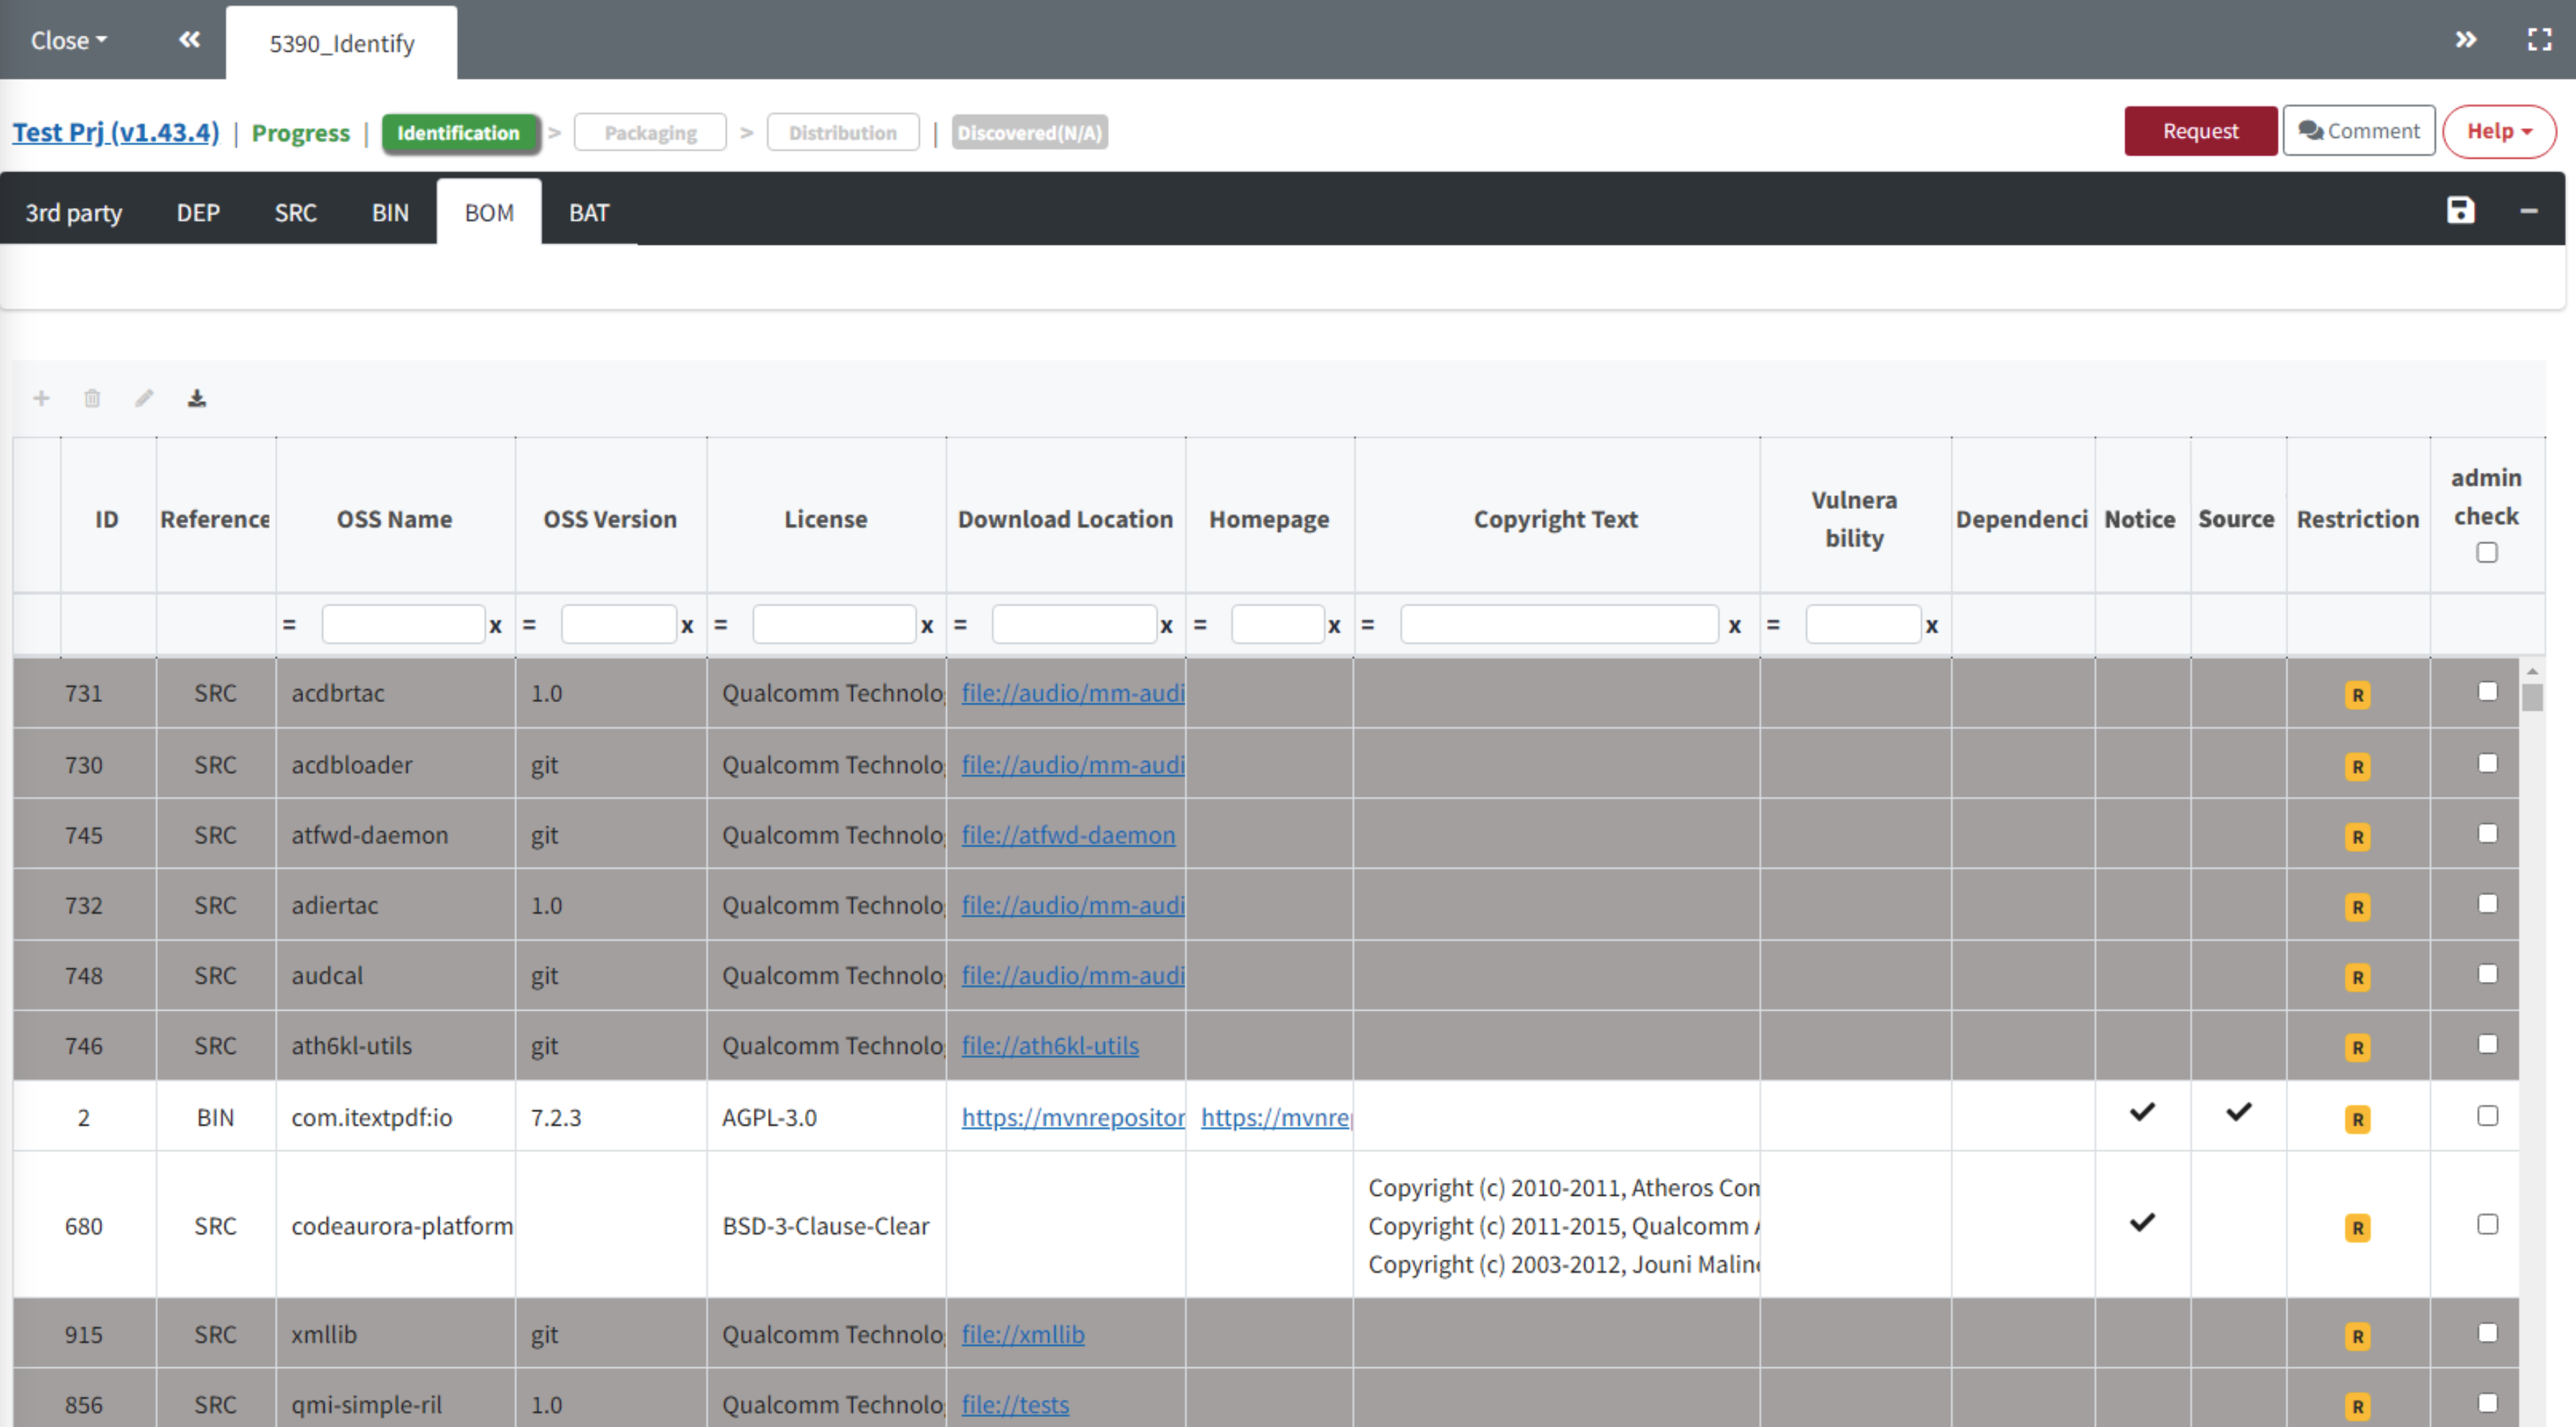
How to Request a Review
- Click the Save button.
- This will consolidate the OSS lists from the 3rd Party, DEP, SRC, and BIN tabs.
- Review the issues highlighted in the Warning messages.
- Click the Request Review button to submit your review request.
- Note that if there are any red Warning Messages, you cannot submit the review request.
(Admin only) Review Process
- Click the Review Start button in the upper right corner of the BOM tab.
- Review the issues highlighted in the Warning messages.
- After clicking Save, click Confirm to activate the Packaging tab.
- If a re-confirmation from the Creator is needed, click Reject to change the status back to Progress.
3. Packaging
- In the Packaging stage, OSS that requires the disclosure of Source Code is compiled into an OSS Package and registered in the FOSSLight Hub.
- The OSS notice is automatically generated when the Packaging stage is confirmed. If any modifications are needed, they can be made in the Notice tab.
- Access this stage by clicking the button in the Packaging column of the Project List.
3-1. Packaging Tab
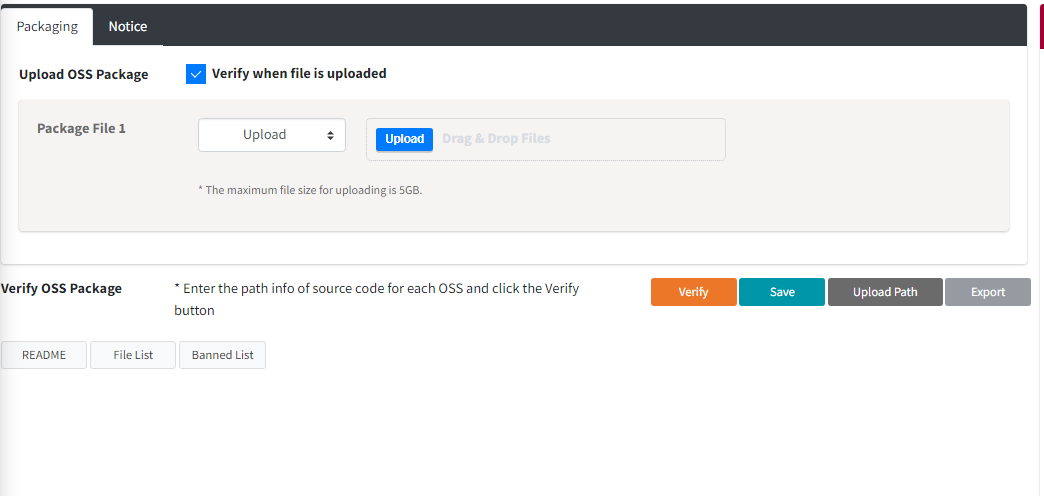
-
OSS Package Upload
- Upload the Packaging file (compressed file) that consolidates the source code.
-
Fill in the "Path of source code in the OSS Package" column.
- If there are many types of Open Source to disclose, download the Packaging OSS List file using the ‘Export Path' button, fill in the paths, and then upload with the ‘Upload Path' button.
- You can save the entered path information with the ‘Save' button.
- Path information is case-sensitive, so please be careful when entering it.
-
Click the ‘Verify' button to perform the verification process.
- After verification, the number of files found in the OSS Package will be displayed in the File Count field. If any Open Source is not found, it will indicate "path not found."
- You can review the README, File List, and Banned List found in the OSS Package:
- README: The README file included in the OSS Package.
- File List: A list of files in the OSS Package.
- Banned List: A list of files that should not be disclosed, such as "Proprietary" or "Commercial."
3-2. Notice Tab
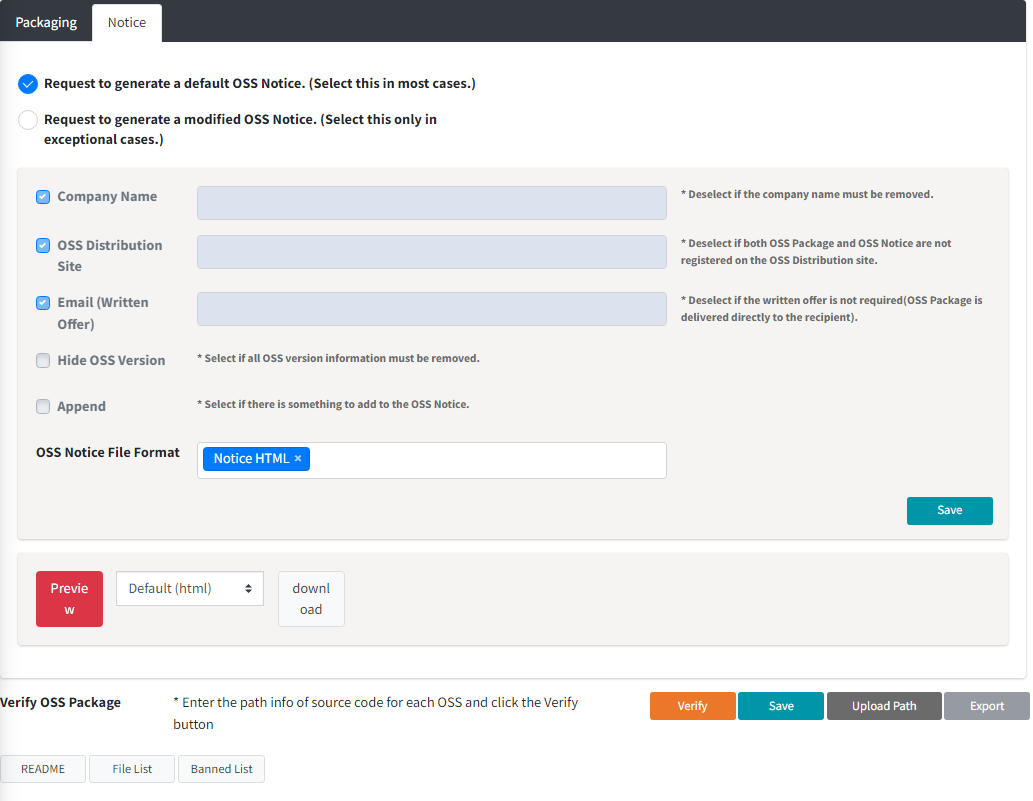
3-3. Requesting Review
- Click the Request Review button at the top right of the Packaging tab to request a review.
3-4. Review Process (Admin Only)
- Click the Review Start button at the top right of the Packaging tab.
- Click Confirm at the top right to confirm the Packaging, completing the OSC Process.
- For Projects where Packaging is confirmed, you can download the issued OSS Notice from the Project List.
- If re-confirmation is needed from the Creator, click Reject to change the Status back to Progress
4. Distribution (Enterprise Only)
When Distribution is performed, the OSS notice and OSS package are registered on the distribution site.
Distribution Sites
- LG Electronics: OSS notices and packages are registered on the LG Open Source site's Product page (https://opensource.lge.com/product).
- Other Companies: Registered on the distribution sites set by each respective company.
(Admin Only) Distribution Authority
- Distribution can only be performed by users with Admin rights since it involves public disclosures.
- For LG Electronics, Admin accounts are granted only to OSC representatives for the division/research lab. If the Project Creator is not the OSC representative, please add the organization's OSC representative to the Project > Watcher section and request them to proceed with the Distribution stage.
⭐Tips for Project
Check OSS Name Button (DEP, SRC, BIN Tab)
Automatically changes to the OSS Name stored in the FOSSLight Hub based on the Download location written in the OSS Table.
- For detailed guidance, please refer to Tips > Common > Pre-Review.
Adding Comments
- You can leave a comment on the project and send that comment via email to the Reviewer, Watcher, and Creator.
- For detailed guidance, please refer to Tips > Common > Comment.
OSS Table's Warning message
- You can identify issues that need review through the Warning Message in the OSS Table.
- The meaning of each Warning Message can be found in Tips > Common > Warning Message.
