REST API v2

To call the functions of FOSSLight, you can use the REST API.

How to start

To call the REST API, you need to issue a TOKEN. Please follow the steps below.

  1. Log in with your Admin account
  2. In the System > User Management tab, you can issue a Token for each User.

REST API List

:sparkles: Refer to the link below for API operation and return value.

- For Demo service: https://demo.fosslight.org/swagger-ui/index.html (integration server : https://demo.fosslight.org/)

Key Required Type Value
Authorization O String Issued token information
How to Enter Token When Using Swagger UI
ℹ️ This is a feature provided to make authentication easier when using Swagger UI. If you are conducting tests with Curl or other API testing tools, you need to include the token information in the header for each API.
• Click the Authorize button.
Authorize button
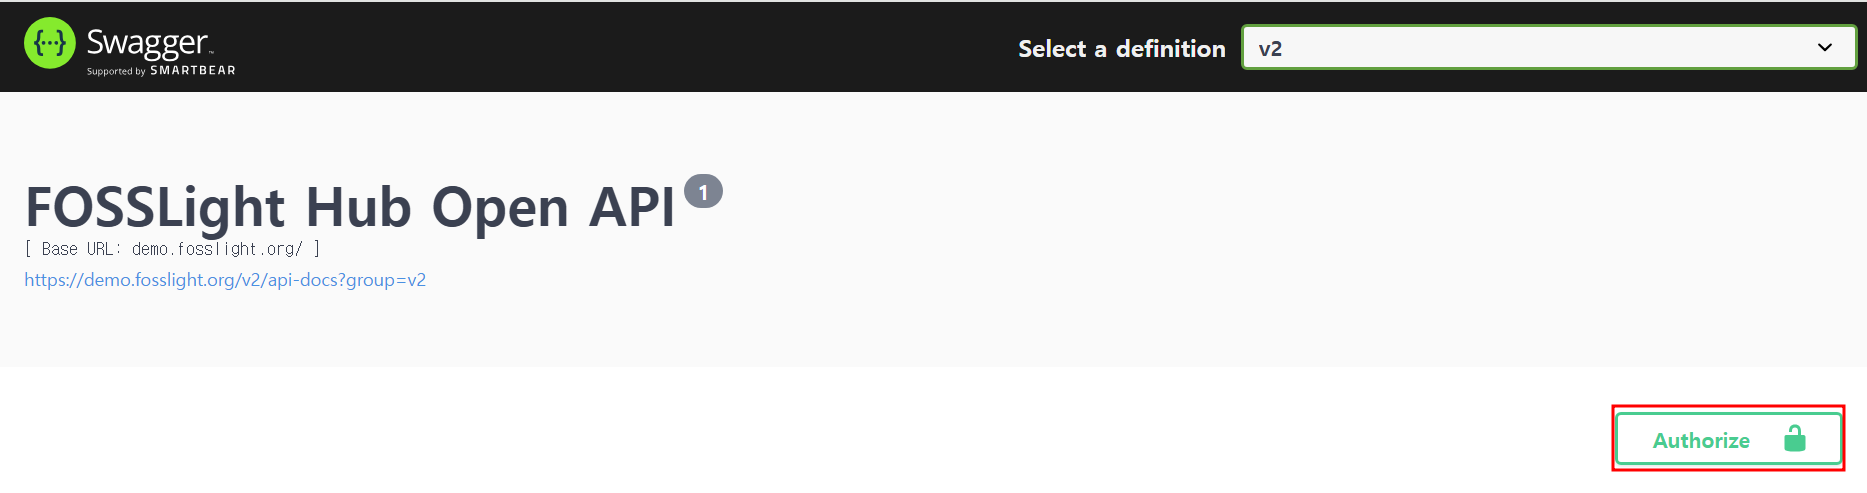
• After entering the token information in the Value field of the popup, click the Authorize button.
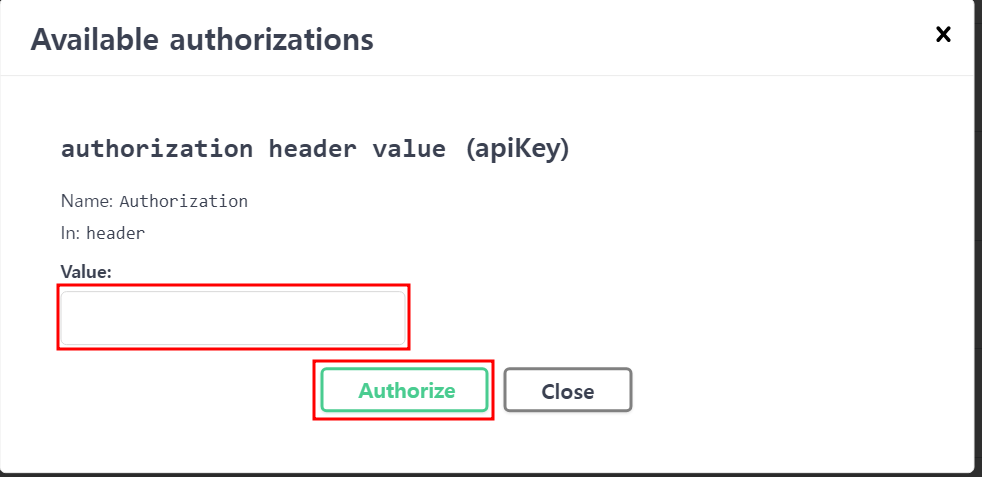
Entering the token.

1. Check OSS & License information

API Response fo Description
GET /api/v2/license JSON Query the license information.

  • licenseName: The name of the license to be queried
  • licenseNameExact: If set to true, only licenses that exactly match the value entered in licenseName will be listed(default = Y)
  • countPerPage: The number of items to be listed at once (default = 10000)
  • page: The page number to query (default = 1)
GET /api/v2/oss JSON Query Open Source information.

  • downloadLocation: Value of the download location to query
  • downloadLocationExact: If set to true, only open source that exactly matches the value entered in downloadLocation will be listed (default = Y)
  • ossName: Name of the open source to query
  • ossNameExact: If set to true, only open source that exactly matches the value entered in ossName will be queried (default = Y)
  • ossVersion: Version of the open source to query
  • countPerPage: Number of items to be listed at once (default = 10000)
  • page: Page number to query (default = 1)
POST /api/v2/oss JSON (Admin only) Register Open Source.

  • Input data according to the ossMaster format
GET /api/v2/refine-download-location JSON (Admin only) Refine OSS information.

  • UPDATE DOWNLOAD LOCATION FORMAT: Update the Download location to match the format supported by Pre-review > Open Source.
  • REMOVE DUPLICATED DOWNLOAD LOCATION: Remove duplicate download locations.
  • PUT PURL: Update PURL.
  • REMOVE DUPLICATED PURL: If the same PURL is set, leave only the data with the shortest length of the download location and delete the duplicates.
  • REORDER GITHUB PRIORITY: If the download location contains "github.com" and the priority is not the first, change the priority.
  • REFINE ALL: Execute the above in order.

2. Check 3rd Party information

API Response Format Description
GET /api/v2/partners JSON Query 3rd Party information.

  • createDate: Query based on the creation date of the 3rd party (fromDate-toDate)
  • creator: Query based on the information of the person who created it
  • division: Query based on division information
  • partnerIdList: Query based on the 3rd party ID. Multiple entries can be input in list format
  • status: Query based on the status of the 3rd party
  • updateDate: Query based on the update date of the 3rd party (fromDate-toDate)
  • countPerPage: Number of items to be listed at once (default = 1000)
  • page: Page number to query (default = 1)
GET /api/v2/partners/{id}/bom/file FILE 3rd party BOM export - Download in file format.

  • (required) format: File format to extract
  • (required) id: 3rd party ID of the target to query
GET ​/api​/v2​/partners​/{id}​/bom/json-data JSON 3rd party BOM export - Received in JSON format.

  • (required) id: 3rd party ID of the target
POST /api/v2/partners/{id}/editors JSON Add an editor to the 3rd party.

  • (required) emailList: Email information of the editors to be added
  • (required) id: 3rd party ID of the target

3. Check project information, upload OSS Report/Packaging, export/comparison of BOM

API Response Format Description
GET /api/v2/projects JSON Retrieve information about the Project including the following items:

  • createDate: Query based on the date the Project was created (fromDate-toDate)
  • creator: Query based on the information of the person who created it
  • division: Query based on division information
  • modelName: Query based on the model name
  • prjIdList: Query based on project ID. Multiple IDs can be input in list form
  • prjName: Query based on the project name
  • prjNameExactYn: Set to true to retrieve only projects that exactly match the input project name
  • status: Query based on the status of the Project
  • updateDate: Query based on the date the Project was modified (fromDate-toDate)
  • countPerPage: Number of items to be listed at once (default = 1000, max = 1000)
  • page: Page number to query (default = 1)
POST /api/v2/projects JSON API for Project Creation. The generated project ID will be returned.

  • additional Information: Additional information about the project
  • distributionSite: Select the distribution site (input as /api/v2/codes value)
  • distributionType: Select the distribution type (input as /api/v2/codes value)
  • networkServerType: Select whether it is a network server
  • noticeType: Select the type of notice (input as /api/v2/codes value)
  • noticeTypeEtc: If it is Platform-generate, select the type (input as /api/v2/codes value)
  • (required) osType: Select the OS type (input as /api/v2/codes value)
  • osTypeEtc: Additional OS type information
  • priority: Select priority based on the urgency of the project (input as /api/v2/codes value)
  • (required) prjName: Project name
  • prjVersion: Project version
  • publicYn: View Permission information (Y: Everyone, N: Creator & Editor) (default = Y)
  • userComment: User comment
GET /api/v2/projects/models JSON Query model information for the Project.

  • (required) prjIdList: Information of the project IDs to be queried. Multiple IDs can be input in list form.
DELETE /api/v2/projects/{id} JSON Delete project (Only projects that have not been distributed can be deleted).

  • (required) id: Target project ID
GET /api/v2/projects/{id}/bom/compare-with/{compareId} JSON Project BOM Compare.

  • (required) compareId: Project ID to be compared
  • (required) id: Reference project ID
GET /api/v2/projects/{id}/bom/file JSON Project BOM export - Download in file format.

  • (required) format: File format to be extracted
  • (required) id: Target project ID
  • saveFlag: Choose whether to update the BOM based on the information at the time of API execution (default = Y)
GET /api/v2/projects/{id}/bom/json-data JSON Project BOM export - Received in JSON format.

  • (required) id: Target project ID
  • saveFlag: Choose whether to update the BOM based on the information at the time of API execution (default = Y)
POST /api/v2/projects/{id}/editors JSON Add an editor to the project.

  • (required) emailList: Email information of the editors to be added
  • (required) id: Target project ID
POST /api/v2/projects/{id}/models JSON Update the project's Model information through a list of model information strings.
(Note: This will only add models; they will not be distributed. If distribution is needed after adding model information, please go to the Distribution tab and proceed with distribution.)

  • (required) id: Target project ID
  • (required) modelListToUpdate: Model information string list (format: MODEL_NAME|Category|Release Date)
    - ex. MODEL_NAME|ETC > Etc|20220428
POST ​/api​/v2​/projects​/{id}​/models​/upload JSON Update the project's Model information using a Model List Excel file.
(Note: This will only add models; they will not be distributed. If distribution is needed after adding model information, please go to the Distribution tab and proceed with distribution.)

  • (required) id: Target project ID
  • (required) modelReport: Excel file of the Model List: Project > Project Information tab > Click the Download button
Model List Excel File
GET /api/v2/projects/{id}/notice JSON Notice for receiving files for the project ID

  • (required) id: Target project ID
POST /api/v2/projects/{id}/packages JSON Upload a package file to the project.

  • packageFile: Package file to be uploaded
  • (required) id: Target project ID
  • verifyFlag: Choose whether to verify the uploaded file (default = N)
GET /api/v2/projects/{id}/security/json-data JSON Query security vulnerability information detected in the project in JSON format

  • (required) id: Target project ID
POST /api/v2/projects/{id}/{tab_name}/oss-load - Load open-source information reviewed in previous projects into the project (Only projects with identification confirmed can be loaded).

  • (required) id: Target project ID
  • prjToLoad: Project ID to load (input if the search condition is id)
  • prjNameToLoad: Project name to load (input if the search condition is name)
  • prjVersionToLoad: Project version to load (input if the search condition is name)
  • resetFlag: Whether to reset existing entered information when loading (default = Y). N - Append while maintaining existing OSS Table entries
  • (required) searchCondition: Criteria for searching the project to load
  • (required) tab_name: Target tab name (bin/dep/src)
POST /api/v2/projects/{id}/{tab_name}/reports - Upload an open-source analyzed report file to the project.

  • ossReport: Report file to be uploaded
  • comment: User comment
  • (required) id: Target project ID
  • resetFlag: Whether to reset existing entered information when uploading the file (default = Y). N - Append while maintaining existing OSS Table entries
  • sheetNames: If you want to update specific sheet names from the uploaded report file, input here. If not entered, information will be loaded based on the default prefixes DEP, SRC, BIN. Multiple sheets can be entered, separated by commas.
  • (required) tab_name: Target tab name
POST /api/v2/projects/{id}/{tab_name}/reset - Reset the tab selected in Project > Identification.

  • (required) id: arget project ID
  • (required) tab_name: Target tab name

4. Check Vulnerability information

API Response Format Description
GET /api/v2/max-vulnerabilities JSON Check the maximum score and CVE ID by OSS Name and Version.

  • (required) OSS Name: Name of the open source to query
  • OSS Version: Version of the open source to query
GET /api/v2/vulnerabilities JSON Query the CVE ID, CVSS Score, CVE ID Link, and OSS Information (OSS Name, OSS Version and Nickname) by OSS Name and Version or CVE ID.

  • cveId: CVE ID to query
  • ossName: Name of the open source to query
  • ossVersion: Version of the open source to query

5. Create Self-Check and register OSS Report

API Response Format Description
POST /api/v2/selfchecks JSON Create a Self-Check Project and receive the generated Self-Check ID.

  • (required) prjName: Self-Check project name
  • prjVersion: Self-Check project version
GET /api/v2/selfchecks/{id} JSON Query the Self-Check project.

  • (required) id: Self-Check project ID to query
GET /api/v2/selfchecks/{id}/bom/file FILE Download the result file exported from Self-Check.

  • (required) id: Self-Check project ID to query
POST /api/v2/selfchecks/{id}/editors - Add editors to Self-Check.

  • (required) emailList: Email information of the editor to add
  • (required) id: Target project ID
POST /api/v2/selfchecks/{id}/report - Upload the analyzed open source report file to Self-Check.

  • ossReport: Report file to upload
  • (required) id: Target Self-Check project ID
  • resetFlag: Whether to reset existing information when uploading the file. N - Append to the existing OSS Table without resetting (default = Y)
  • sheetNames: If you want to update specific sheet names from the report file to upload, enter them here. If not entered, information will be fetched based on the default prefixes DEP, SRC, BIN. Multiple sheets can be entered separated by commas (,).

6. Check the value of the code used when using API

API Response Format Description
GET /api/v2/codes JSON Query the list of values for the following parameters to be used when creating a project and querying 3rd Party in Self-Check.

  • (required) codeType: Enter the abbreviation for the category of the code you want to query.
    • Division: DIV
    • OS Type: OS
    • Distribution Type: DSTT
    • Distribution Site: DSTS
    • Notice Type: NOTI
    • Notice Platform: NP
    • Priority: PRI
  • detailValue: Input among the values in the category (codeType).

7. Check Binary DB

API Response Format Description
GET /api/v2/binaries JSON Query based on the following information from the Binary DB.

  • Binary Name
  • Checksum
  • TLSH
  • License
  • Download Location
  • OSS Name
  • OSS Version
  • Project Name

8. Compliance Status

API Response Format Description
(enterprise only)POST /api/v2/compliance/3rdparty-status JSON Query 3rd Party Status using the 3rd Party creation date and Division.

  • division: Enter the value from /api/v2/codes
  • schEndDate: Search range (based on creation date)
  • schStartDate: Search range (based on creation date)
(enterprise only)POST /api/v2/compliance/product-status JSON Query Product Status using the Project creation date, Model release date, and Division.

  • division: Enter the value from /api/v2/codes
  • modelDistributedEndDate: Search range (based on distribution date)
  • modelDistributedStartDate: Search range (based on distribution date)
  • modelListInfo: Search for model information
  • schEndDate: Search range (based on creation date)
  • schStartDate: Search range (based on creation date)

Error code

In case of an error, an HTTP Response Code other than 2xx will be returned.