FOSSLight Dependency Scanner


FOSSLight Dependency Scanner is a tool that supports dependency analysis for multiple package managers. It automatically detects manifest files of package managers and analyzes dependencies using open source tools. Then, it generates a report file containing OSS information of dependencies.
Supported Package Managers
Installation
Install from Bee (LGE Only)
You can install and use FOSSLight Scanner from Bee.
General Installation Method
FOSSLight Scanner can be installed using pip3.
It is recommended to install in a python3 virtualenv environment.
$ pip3 install fosslight_dependency
How to Run and Output
- Please follow the prerequisites and execution methods according to the package manager used in your project.
- Dependency analysis must be performed in the same build environment as the package manager used during actual development. (e.g., npm build tools must be installed on the server to perform npm dependency analysis)
- For Windows, you can download and use the exe executable from release assets.
[NodeJS] Npm or Yarn
How to Run
- Run the following command in the directory where package.json exists.
$ fosslight_dependency- If the node_modules directory is already installed, run with the -m option.
- If you want to analyze only production dependencies, the node_modules directory must contain only production packages. (Install with $npm install --production)
$ fosslight_dependency -m npm
[NodeJS] Pnpm
How to Run
No prerequisites required. You can run it directly.
- Run the following command in the directory where package.json exists.
$ fosslight_dependency
[Java/Kotlin] Gradle
Prerequisites
- For Java/Kotlin (gradle), if the gradlew executable file and build.gradle file exist in the input directory, the plugin addition and execution are automatically performed inside FOSSLight Dependency Scanner, so you can proceed directly to the execution method.
How to Run
- Run the following command in the path where build.gradle (gradle's manifest file) exists.
$ fosslight_dependency
[Java] Android(Gradle)
Prerequisites
- For Android (gradle), if the gradlew executable file and build.gradle file exist in the input directory, the plugin addition and execution are automatically performed inside FOSSLight Dependency Scanner, so you can proceed directly to the execution method.
- If the Android application project does not have an ‘app' (or module name) directory, please refer to the Java/Kotlin Gradle guide to perform Dependency analysis.
How to Run
- Run the following command in the path where build.gradle (gradle's manifest file) exists.
$ fosslight_dependency- If the application folder name is not ‘app', you must specify the application folder name with the -n option.
$ fosslight_dependency -n {application_name}
- If the application folder name is not ‘app', you must specify the application folder name with the -n option.
[Python] Pypi
- It is recommended to set up a virtual environment to separate the project dependencies from globally installed Python dependencies in the system.
- If ‘requirements.txt’, ‘setup.py’ or ‘pyproject.toml’ files exists in the input path, FOSSLight Dependency Scanner can automatically install dependencies and run the analysis.
Prerequisites
- It is recommended to use a virtual environment to avoid mixing with global Python packages.
How to Run
- Run the following command in the project root directory (e.g., the path where requirements.txt is located).
At this time, to prevent debugging packages used during development or globally installed packages from being included in the analysis results, requirements.txt should contain only the packages needed for distribution.$ fosslight_dependency
[Java] Maven
Prerequisites
- Maven version 3.5.4 or higher is required.
- JAVA environment must be installed. (OpenJDK 11 or higher required)
How to Run
- Run the following command in the path where pom.xml (Maven's manifest file) exists.
$ fosslight_dependency
Note: When using a separately configured build output directory
- The licenses.xml file will be created under {buildDir}/generated-resources. In this case, you must specify the build output directory with the -o option when running fosslight_dependency.
$ fosslight_dependency -o customized_output_directory_name
[Dart/flutter] Pub
Prerequisites
- Flutter must be installed to build the project.
How to Run
- Run the following command in the path where pubspec.yaml exists.
$ fosslight_dependency
[Swift/Obj-C] CocoaPods
Prerequisites
- Install Pod packages.(MacOS)
  # First, check if cocoapods is installed.
  $ pod --version
  # If not installed, run the following command.
  $ sudo gem install cocoapods
  # In the top directory of the project where Podfile exists, run the following command to install Pod packages.
  $ pod install
How to Run
- Run as follows in the directory where Podfile.lock exists.
$ fosslight_dependency
[Swift] Swift Package Manager
Prerequisites
- Create a Personal Access Token to query License information from Github repository, then use it with the -t parameter when running FOSSLight Dependency Scanner. Please refer to the Github docs guide for how to create a token.
How to Run
- Run the following command in the directory where Package.resolved file is located.
$ fosslight_dependency -t <Github_Personal_Access_Token>
Execution Tip
- You can run it using the following command in the path where {project_name}.xcodeproj file is located.
$ fosslight_dependency -t <Github_Personal_Access_Token>
- In this case, it automatically finds the ‘Package.resolved' file in {project_name}.xcodeproj/project.xcworkspace/xcshareddata/swiftpm and runs the program.
[Swift/Obj-C] Carthage
Prerequisites
- If the Cartfile directory is already created for an already built project, you can run the script immediately without running the carthage update command (which creates the ‘Cartfile.resolved' file).
$ carthage update - Create a Personal Access Token to query License information from Github repository, then use it with the -t parameter when running FOSSLight Dependency Scanner. Please refer to the Github docs guide for how to create a token.
How to Run
- Run the following command in the directory where Cartfile.resolved file is located.
$ fosslight_dependency -t <Github_Personal_Access_Token>
[Go] Go
How to Run
Go is available for v1.14 or higher, and can be run immediately without any prerequisites.
- Run the following command in the directory where go.mod (go's manifest file) is located.
fosslight_dependency
[.NET] Nuget
How to Run
Can be run immediately without prerequisites.
- Run the following command in the top directory of the project.
$ fosslight_dependency
Execution Tip
- CPM project (Central Package Management)
- You must run it from the path where
Directory.Packages.propsfile exists.- If
obj/project.assets.jsonfile does not exist, it will find.csprojor.slnfiles in subdirectories and automatically rundotnet restoreto generateproject.assets.jsonfile before proceeding with analysis.- When copying packages folder to use as reference (project without packages.config)
- If you copied the packages folder from another project as-is and are using it as a reference, and packages.config file does not exist, create packages.config through the following procedure and then run FOSSLight Dependency Scanner.
- Procedure to create packages.config
- Close the project.
- If packages.config exists in the project folder, delete it.
- Remove all library reference items installed through NuGet from the .csproj file.
- If necessary, perform NuGet cache deletion and Solution Clean.
- Reopen the project and verify that all references are removed and packages.config file does not exist.
- Then install packages through NuGet again, and a new packages.config will be created and packages will be installed normally.
[Kubernetes] Helm
How to Run
Can be run immediately without prerequisites.
- Run the following command in the directory where Chart.yaml file is located.
$ fosslight_dependencyFOSSLight Dependency Scanner only works in an environment where the ‘helm dependency build' command runs normally to collect OSS information.
If an error occurs during Helm execution, please resolve the error and run the scanner again.
[Unity] Unity Package Manager
How to Run
Can be run immediately without prerequisites.
- Run the following command in the directory where Library folder exists.
$ fosslight_dependency
[Rust] Cargo
How to Run
Can be run immediately without prerequisites.
- Run the following command in the directory where Cargo.toml file exists.
$ fosslight_dependency
Output Result
Verify that the ‘fosslight_report_dep_[datetime].xlsx' result file is created in the execution path.
The output path can be changed using the -o option. 
Options
📖 Usage
    ────────────────────────────────────────────────────────────────────
    fosslight_dependency [options] <arguments>

    📝 Description
    ────────────────────────────────────────────────────────────────────
    FOSSLight Dependency Scanner analyzes dependencies for multiple package
    managers. It detects manifest files automatically and generates reports
    containing OSS information of dependencies.

    📚 Guide: https://fosslight.org/fosslight-guide-en/scanner/3_dependency.html

    📦 Supported Package Managers
    ────────────────────────────────────────────────────────────────────
    Gradle, Maven (Java)          │ NPM, PNPM, Yarn (Node.js)
    PIP (Python)                  │ Pub (Dart/Flutter)
    Cocoapods, Swift, Carthage    │ Go (Go)
    Nuget (.NET)                  │ Helm (Kubernetes)
    Unity (Unity)                 │ Cargo (Rust)

    ⚙️  General Options
    ────────────────────────────────────────────────────────────────────
    -p <path>              Path to analyze (default: current directory)
    -o <path>              Output file path or directory
    -f <format>            Output formats: excel, csv, opossum, yaml, spdx-yaml, spdx-json, spdx-xml, spdx-tag, cyclonedx-json, cyclonedx-xml
    -e <pattern>           Exclude paths from analysis (files and directories)
                           ⚠️  IMPORTANT: Always wrap in quotes to avoid shell expansion
                           Example: fosslight_dependency -e "test/" "node_modules/"
    -h                     Show this help message
    -v                     Show version information

    🔍 Scanner-Specific Options
    ────────────────────────────────────────────────────────────────────
    -m <manager>           Specify package manager (npm, maven, gradle, pypi, pub,
                           cocoapods, android, swift, carthage, go, nuget, helm,
                           unity, cargo, pnpm, yarn)
    -r                     Recursive mode: scan all subdirectories for manifest files
    --graph-path <path>    Save dependency graph image (pdf, jpg, png) (recommend pdf extension)
                           Example: fosslight_dependency --graph-path /your/path/filename.[pdf, jpg, png]
    --graph-format <format> Set graph image format (default: pdf)
    --graph-size <w> <h>   Set graph image size in pixels (requires --graph-path)
    --direct <True|False>  Print direct/transitive dependency type
                           Choose True or False (default: True)
    --notice               Print the open source license notice text

    🔧 Package Manager Specific Options
    ────────────────────────────────────────────────────────────────────
    Swift, Carthage:
      -t <token>           GitHub personal access token

    Pypi:
      -a <cmd>             Virtual environment activate command
                           (ex: 'conda activate myenv')
      -d <cmd>             Virtual environment deactivate command
                           (ex: 'conda deactivate')

    Gradle, Maven:
      -c <dir>             Customized build output directory
                           (default: 'build' for gradle, 'target' for maven)

    Android:
      -n <name>            Application directory name (default: app)

    💡 Examples
    ────────────────────────────────────────────────────────────────────
    # Scan current directory
    fosslight_dependency

    # Scan specific path with exclusions
    fosslight_dependency -p /path/to/project -e "test/" "vendor/"

    # Generate output in specific format
    fosslight_dependency -f excel -o results/

    # Specify package manager
    fosslight_dependency -m npm -p /path/to/nodejs/project

    # Recursive scan with all subdirectories
    fosslight_dependency -r

    # Generate dependency graph
    fosslight_dependency --graph-path dependency_tree.pdf
- Pattern matching guide for the -e option Pattern Matching Guide
- ⚠️ You must use double quotes ("") when entering values.
- Example) fosslight_dependency -e "dev/" "tests/"
- ⚠️ File names and extensions are case-sensitive, so enter them exactly as intended.
- ⚠️ You must use double quotes ("") when entering values.
Tips to run
-
When running FOSSLight Dependency Scanner, it sequentially detects manifest files of package managers from the input path (using the ‘-p' option), and if a manifest file is detected, it stops detecting manifest files in subdirectories and performs dependency analysis. (If you want to perform dependency analysis for all manifest files found in the entire input path, please run with the ‘-r' option.) The manifest files for each package manager are as follows:
- Npm : package.json - Pnpm : pnpm-lock.yaml - Yarn : package.json - Pypi : requirements.txt / setup.py / pyproject.toml - Maven : pom.xml - Gradle (Android) : build.gradle - Pub : pubspec.yaml - Cocoapods : Podfile - Swift : Package.resolved - Carthage : Cartfile.resolved - Go : go.mod - Nuget : packages.config / {project name}.csproj / Directory.Packages.props - Helm : Chart.yaml - Unity : Library/PackageManager/ProjectCache - Cargo : Cargo.toml -
Supplementary Output
- fosslight_log_dep_[datetime].txt: File containing execution logs
- third_party_notice.txt : Created only when running with Unity, which collects and outputs third party notices for each package
Graph Network Creation Result
# $ fosslight_dependency -p /project/path --graph-path ~/temp/graph.png --graph-size 1000 1000
$ cd ~/temp
$ tree
.
└── graph.png
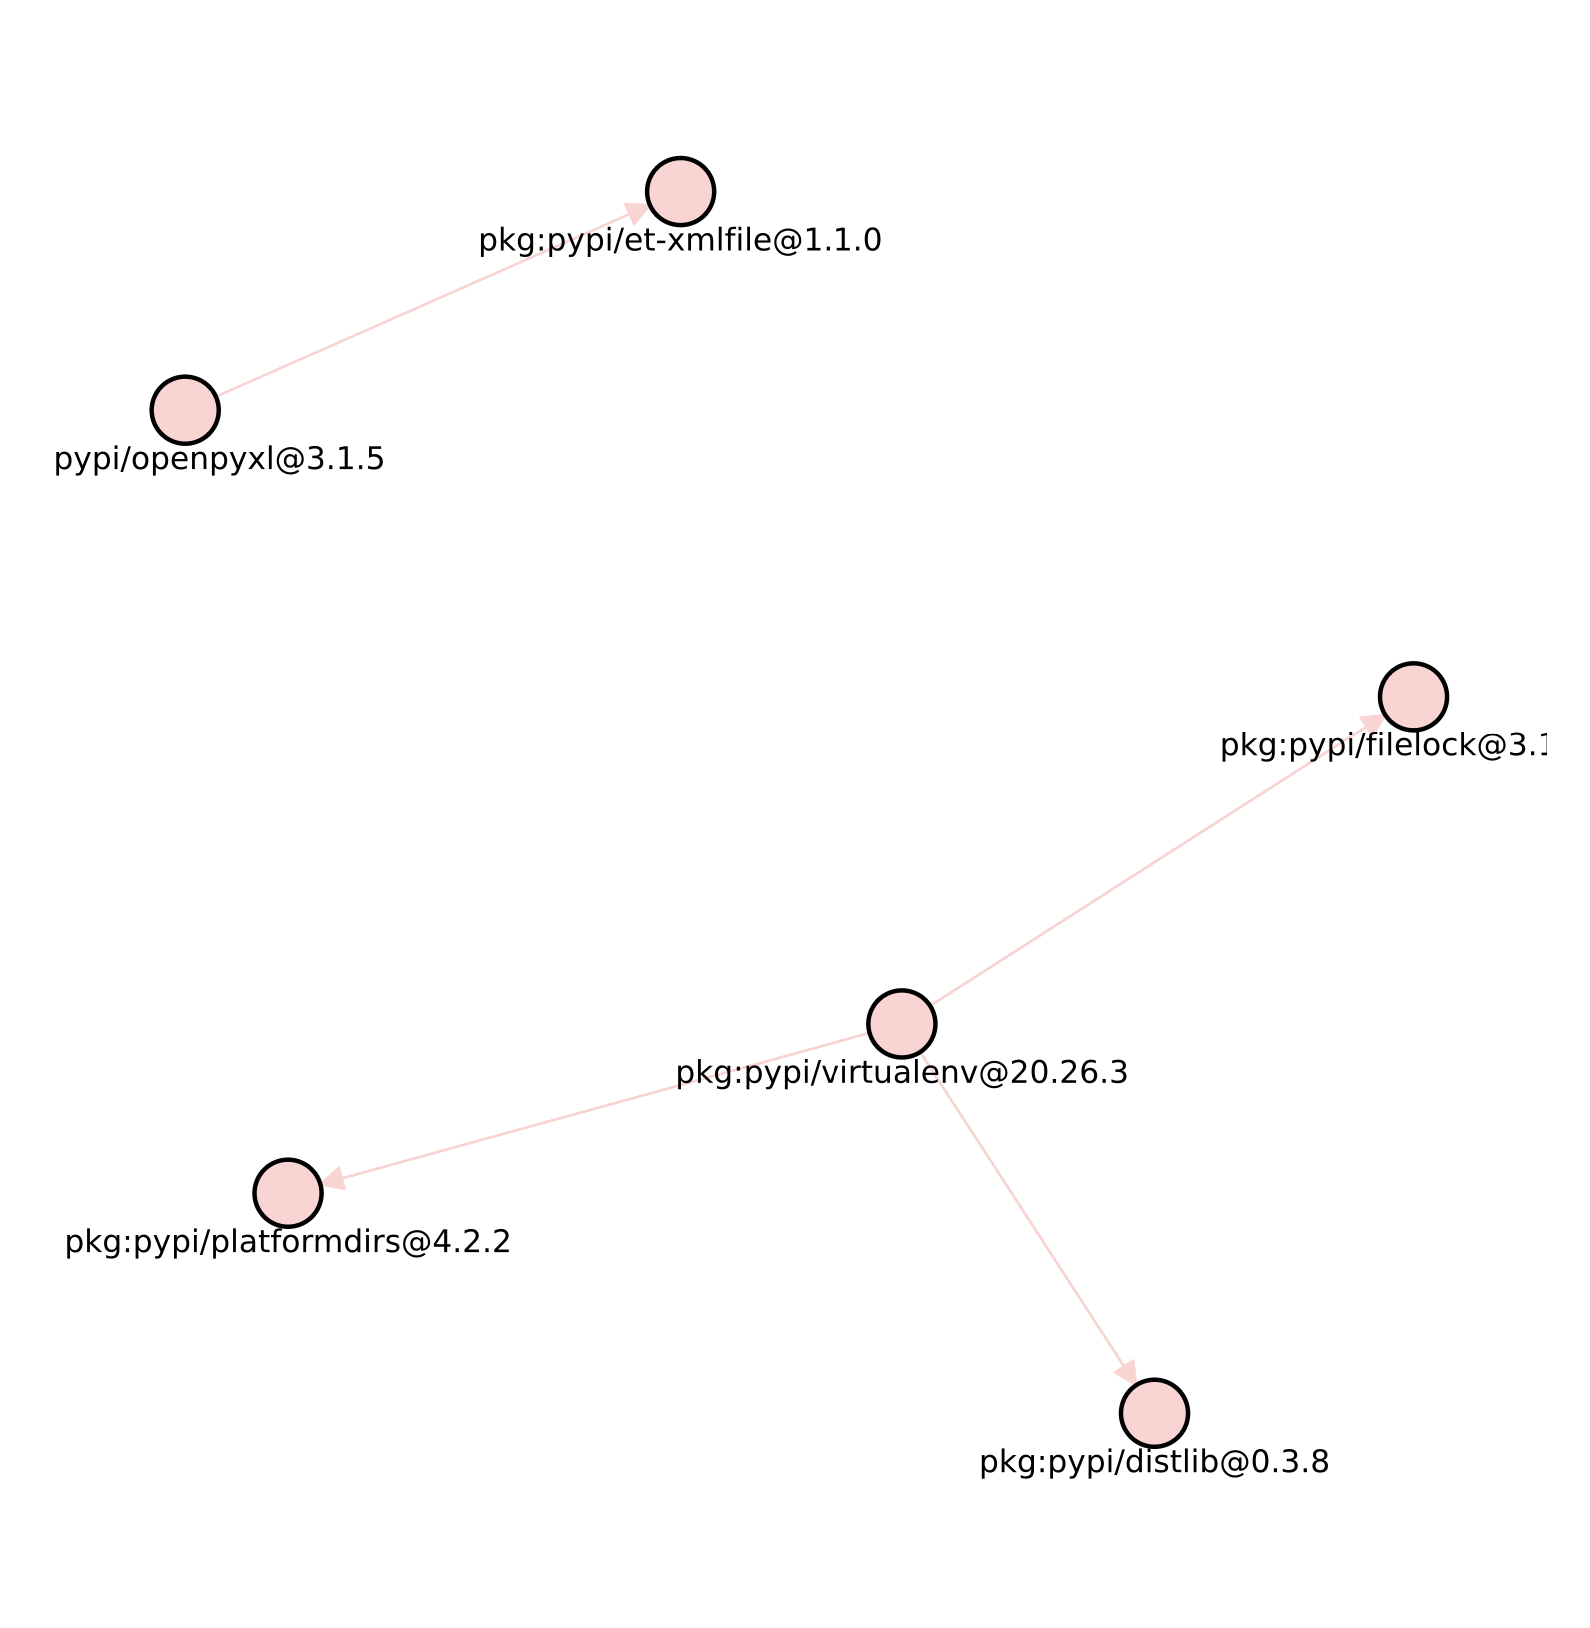
- Saves a dependency relationship graph image using the Depends On section from the fosslight_report_dep_[datetime].xlsx file result
Result File Contents
The FOSSLight Report result file records OSS information based on manifest files of all analyzed dependencies including transitive dependencies. At this time, to write a unique OSS name, the OSS name is recorded in the format of (package manager):(OSS name) or (group id):(artifact id).
| Package manager | OSS Name | Download Location | Homepage |
|---|---|---|---|
| Npm, Pnpm, Yarn | npm:(oss name) | npmjs.com/package/(oss name)/v/(oss version) | Priority1. repository in package.json Priority2. npmjs.com/package/(oss name) |
| Pypi | pypi:(oss name) | pypi.org/project/(oss name)/(version) | homepage in (pip show) information |
| Maven & Gradle & Android | (group_id):(artifact_id) | mvnrepository.com/artifact/(group id)/(artifact id)/(version) | mvnrepository.com/artifact/(group id)/(artifact id) |
| Pub | pub:(oss name) | pub.dev/packages/(oss name)/versions/(version) | homepage in (pub information) |
| Cocoapods | cocoapods:(oss name) | source in (pod spec information) | cocoapods.org/pods/(oss name) |
| Swift | swift:(oss name) | repositoryURL in Package.resolved | repositoryURL in Package.resolved |
| Carthage | carthage:(oss name) | github repository in Cartfile.resolved | github repository in Cartfile.resolved |
| Go | go:(oss name) | pkg.go.dev/(oss name)@(oss version) | repository in pkg.go.dev/(oss name)@(oss version) |
| Nuget | nuget:(oss name) | Priority1. repository in nuget.org/packages/(oss name)/(oss version) Priority2. projectUrl in nuget.org/packages/(oss name)/(oss version) Priority3. nuget.org/packages/(oss name)/(oss version) | nuget.org/packages/(oss name) |
| Helm | helm:(oss name) | first url of sources in (Chart.yaml) | home in (Chart.yaml) |
| Unity | (oss name) | url in repository in ProjectCache | url in repository in ProjectCache |
| Cargo | cargo:(oss name) | repository of the package in the result file for ‘cargo metadata' | crates.io/crates/(oss name) |
- For Npm, Maven, and gradle result file contents, if packages are installed through local path or local repository (not distributed on npmjs.com / mvnrepository), the download location may differ from the actual one.
- Helm can only output dependencies listed in the dependencies section of the root project’s Chart.yaml file, and currently does not support outputting dependency items of each dependency. Also, it obtains OSS information of each dependency from the Chart.yaml file information in the .tgz file downloaded in the charts/ directory after executing the ‘helm dependency build’ command.Therefore, if information such as License or Homepage is missing in Chart.yaml, that information cannot be obtained, so users need to manually check and supplement it.
Package Support Level
| Language/ Project | Package Manager | Manifest file | Direct dependencies | Transitive dependencies | Relationship of dependencies (Dependencies of each dependency) | Internet Access Required |
|---|---|---|---|---|---|---|
| Javascript | Npm | package.json | O | O | O | X |
| Pnpm | pnpm-lock.yaml | O | O | O | X | |
| Yarn | package.json | O | O | O | X | |
| Java | Gradle | build.gradle, build.gradle.kts | O | O | O | X |
| Maven | pom.xml | O | O | O | X | |
| Java (Android) | Gradle | build.gradle, build.gradle.kts | O | O | O | X |
| ObjC, Swift (iOS) | Cocoapods | Podfile.lock | O | O | O | X |
| Carthage | Cartfile.resolved | O | O | X | O | |
| Swift (iOS) | Swift | Package.resolved | O | O | O | O |
| Dart, Flutter | Pub | pubspec.yaml | O | O | O | X |
| Go | Go | go.mod | O | O | O | O |
| Python | Pypi | requirements.txt, setup.py, pyproject.toml | O | O | O | X |
| .NET | Nuget | packages.config, obj/project.assets.json | O | O | O | O |
| Kubernetes | Helm | Chart.yaml | O | X | X | X |
| Unity | Unity | Library/PackageManager/ProjectCache | O | O | X | X |
| Rust | Cargo | Cargo.toml | O | O | O | X |
Internet Access Required Criteria: Internet access is required if license, homepage, or other OSS information cannot be resolved using only local manifest/lock/cache/plugin output files.